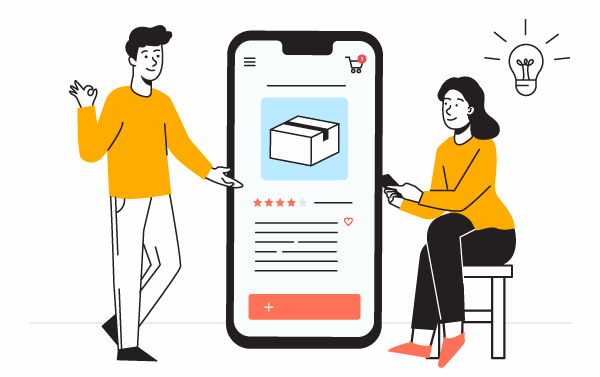
Ever wonder how to actually list your first product on Shopify?
If you've got an idea, a supplier, or even just a product photo, you're likely asking: "What's the exact process to add a product to my store?"
Good news: it's a lot easier than you think!
We put a lot of effort into this step-by-step guide to show you exactly how to add products to Shopify, whether you're uploading manually, using CSV files, managing variants and metafields, selling digital products, or syncing with suppliers like AliExpress or Printify.
Quick Answer: How to add products to Shopify
To add products to Shopify, log into your admin, click on "Products," then select "Add product." Enter your product's title, description, images, and price. Set inventory and shipping details, then save.
You can also import products in bulk using a CSV file or from suppliers like AliExpress and Printify via their Shopify apps.
Now, let's go step by step, how to do it right, what to avoid, and what options you have as your store grows!

Start your store on Shopify
Free 3-day trial + $1/month for 3 months
- Grows with you from first test product to full brand
- Thousands of apps and hundreds of themes to customize your store
- Beginner-friendly editor with pro features when you're ready
No card to start. Cancel anytime.
Adding products to Shopify in 2026 (Step-by-step)
Let's dive in!
Step 1: Complete the prerequisites
Before we start adding products to your Shopify store, let's make sure you have everything you need.
Getting organized now will save you time later and make the process much smoother.
A. Set up your Shopify account
First, you'll need a Shopify account.
If you haven't created one yet, no worries!
Just go to shopify.com and sign up. Shopify offers a free 3-day trial + 3 months for $1 each:

B. Gather your product information
Next, you'll want to gather all the information about the products you plan to sell.
Having this information ready will make adding products quick and easy.
Here's a checklist of the most important information:
- Product titles. Clear names for each product.
- Product descriptions. Descriptions that highlight benefits and any unique selling points.
- High-quality images. Good photos are crucial.
- Pricing. Decide on the selling price.
- Inventory levels. Know how many units you have in stock (if you're not dropshipping).
- Any special attributes. Such as color options, sizes, or materials.
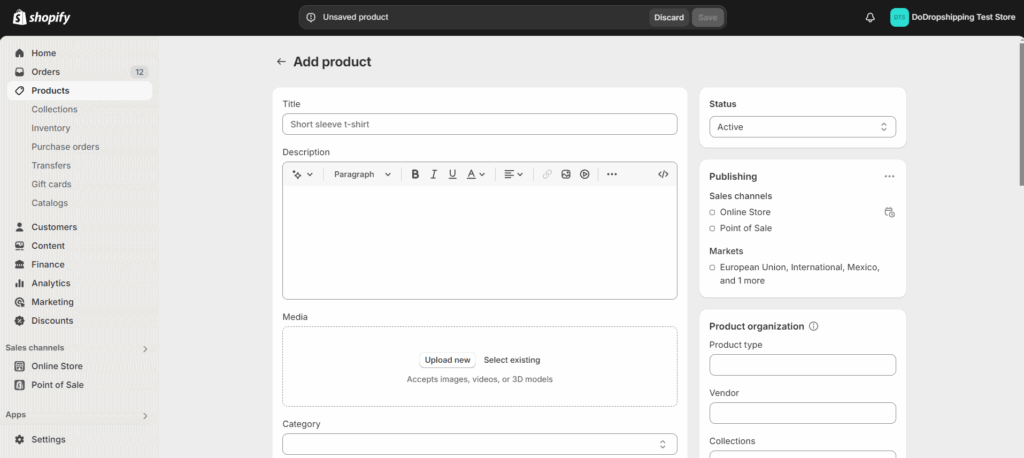
Step 2: Click on 'Add product'
Now that you have your Shopify account and product information, let's start adding your products!
Once you're logged in, you'll see your Shopify admin dashboard.
Click on "Products" to go to the products page. Once you've added your products, they will be listed here.
In the top right corner of the products page, you'll see a button that says "Add product." Click on this button to open the product creation page.

You're now ready to start entering the details of your product, which we'll cover in the next steps.
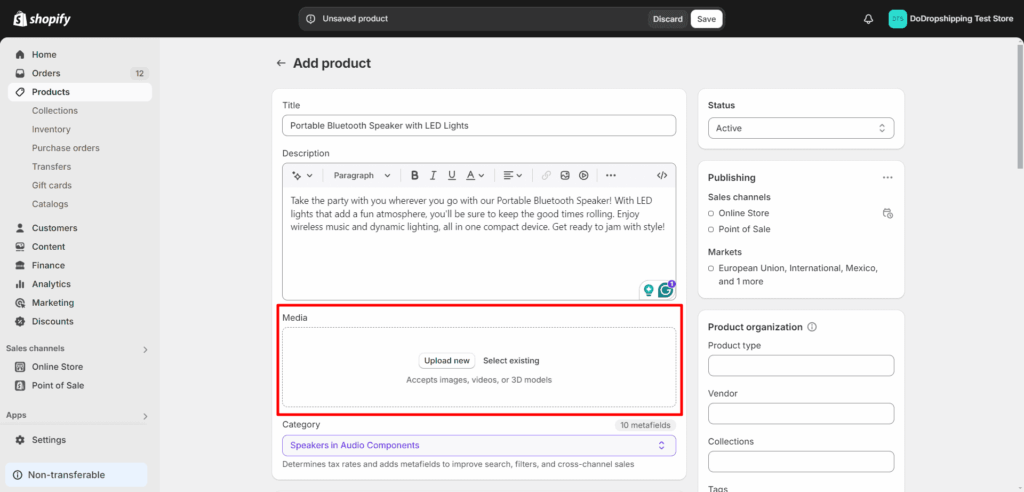
Step 3: Enter the product details
Here's the page you should see now:
At the very top, you'll see a field labeled "Title." This is where you type the name of your product.
Use a straightforward name that tells customers exactly what the product is. For example, instead of "Super Gadget," try "Portable Bluetooth Speaker with LED Lights."
You can also think about what words your customers might use when searching for your product. Including these can help your product show up in search results.
Just below the title is the "Description" box.
This is where you can provide more details about your product.
Here are some quick tips:
- Highlight the benefits. Explain what makes your product special. What problems does it solve? How does it improve the customer's life?
- Organize information. Use headings, bullet points, or numbered lists to make the text easier to scan.
- Tell a story (optional). If appropriate, share the inspiration behind the product or how it was made.
You can check out our article here for more information on how to write a good product description!
Step 4: Add product images
In the "Media" section, just below the description, you can add images and videos of your product:
A few tips for your product images:
- Use high-resolution images. This one is obvious, but it's crucial to use clear, sharp images. Blurry or pixelated pictures can discourage buyers. For square product images, a size of 2048 x 2048 pixels is recommended.
- Set the main image. The first image will be the main picture customers see. Make sure this one shows the product clearly.
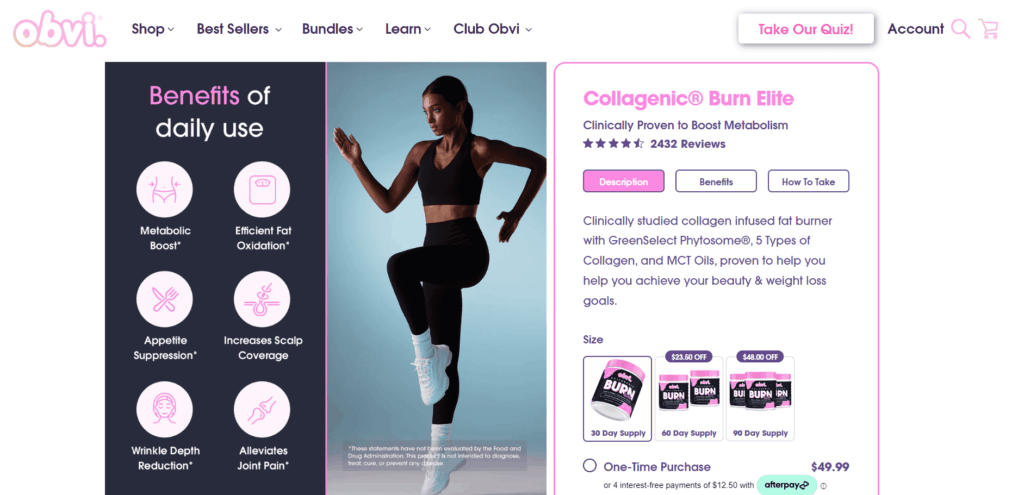
- Show the product benefits and social proof in the images. Some people will only check your images and not scroll down to learn more about your product's benefits. So, it's a great idea to show all your product's benefits and social proof in the images as well. Obvi is a brand that does this well:
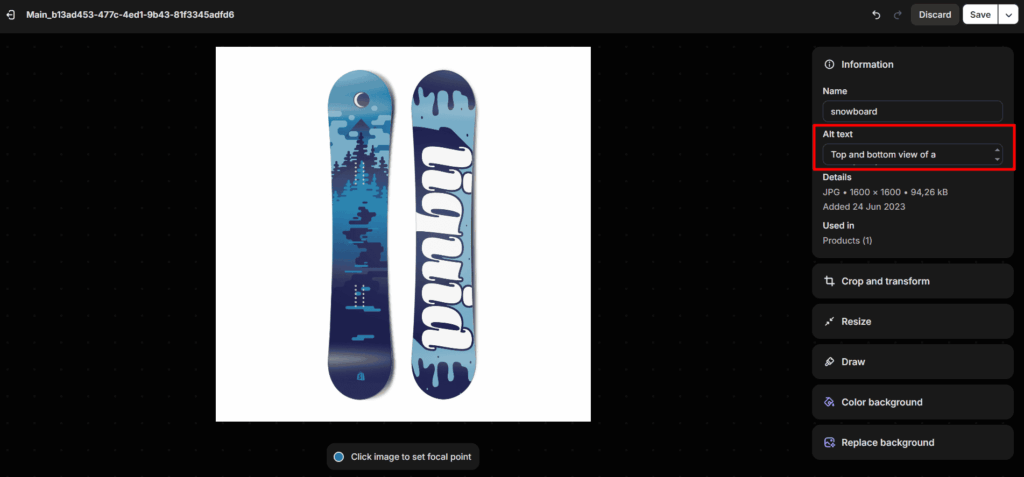
- Add Alt text. Alternative (Alt) text is a short description of an image that helps with search engine optimization (SEO). You can add it here after clicking on an image you've added:
Step 5: Add the category
Below the "Media" section is the "Category" section:
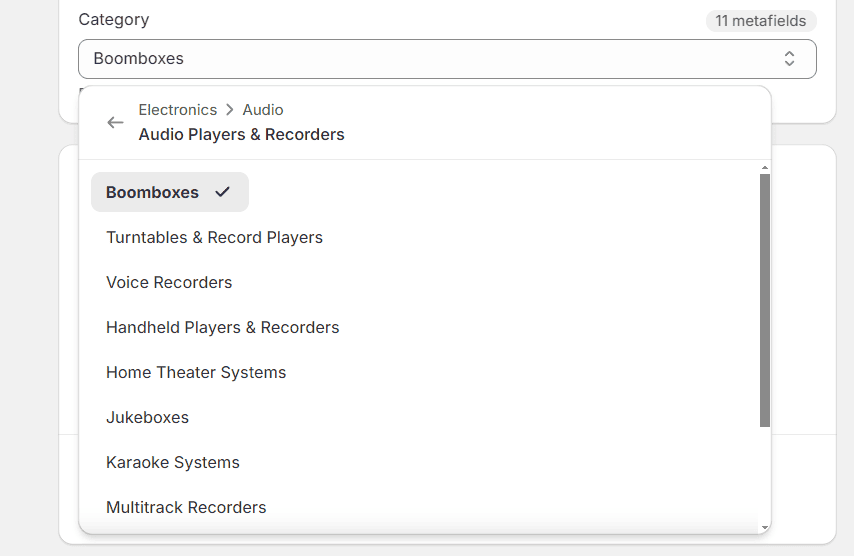
Adding the right category here helps Shopify to select the right tax rates and add important metafields.
The more precise you are, the better. Instead of selecting a broad category like "Clothing," choose "Men's Clothing > Shirts > T-Shirts."
Step 6: Set the pricing
Now it's time to input pricing information in Shopify:
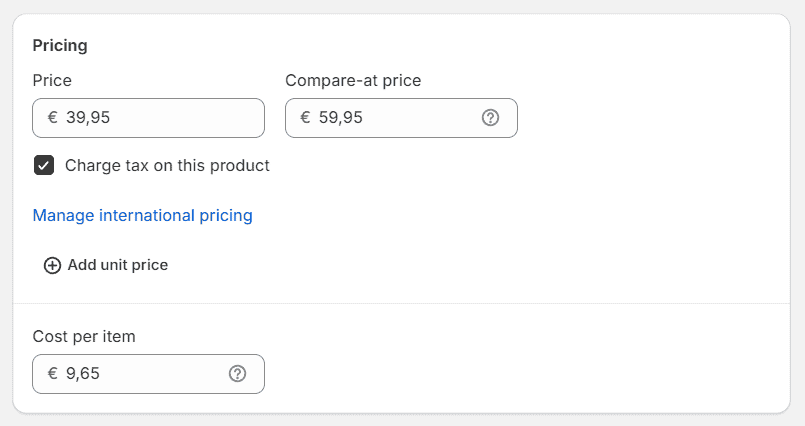
Here's what you can fill in:
- Price field. In the "Price" box, enter the amount you want to charge for your product.
- Example: If you're selling a product for $29.99, enter "29.99" in the price field.
- Compare-at price field. If you're offering a discount, enter the original price in the "Compare-at price" field.
- Example: If the original price was $39.99 but you're selling it for $29.99, enter "39.99" in the compare at price field. Customers will see that they're saving $10.
- Tax settings. If your product is taxable, make sure the "Charge taxes on this product" checkbox is checked. Shopify will calculate the taxes based on your store's tax settings and the customer's location.
- Cost per item field. This is how much it costs you to acquire or produce the product. Entering this information helps you track your profit margins.
Remember, pricing isn't set in stone. You can always adjust your prices based on sales performance or changes in your costs.
Step 7: Set the inventory settings
Now, let's set up your inventory settings so you always know what's in stock and avoid selling products you don't have.
Scroll down until you find the "Inventory" section:
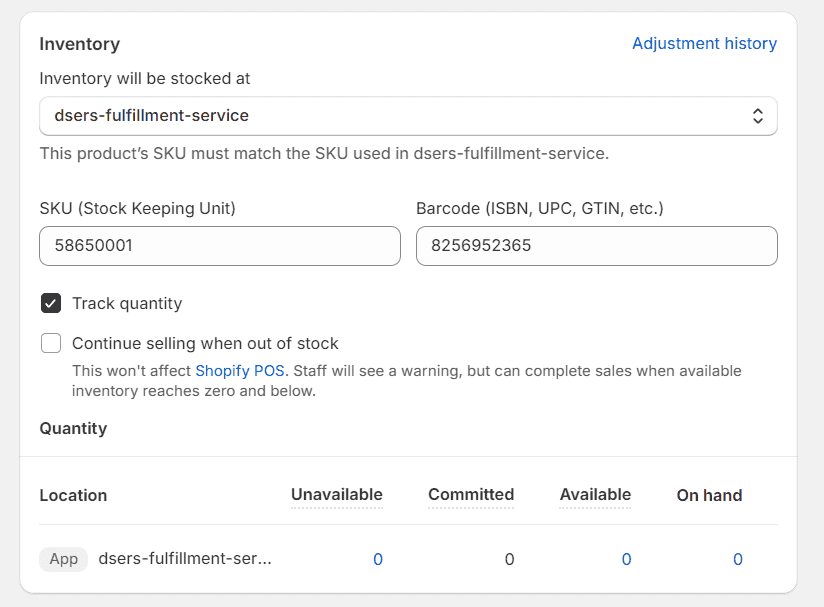
First, you can choose if your inventory is tracked by Shopify or a different service. For example, if you're using an app like DSers, you'll see it in the options.
Next, you can assign an SKU (Stock Keeping Unit).
This is a unique code you assign to each product or variant in your store. It helps you keep track of inventory internally.
You can simply enter a combination of letters and numbers that makes sense to you. For a medium-sized blue T-shirt, you might use "TSHIRT-BLUE-MED."
Adding a barcode is optional.
Barcodes like ISBN, UPC, or GTIN are standard codes used to identify products universally.

So, if your product has a barcode (common with branded or retail products), enter it in the "Barcode" field.
Lastly, you can check the box labeled "Track quantity" if you want to monitor the number of units you have left. If you're selling products online without inventory, you can uncheck this.
In the "Quantity" field, enter the number of units you have in stock.
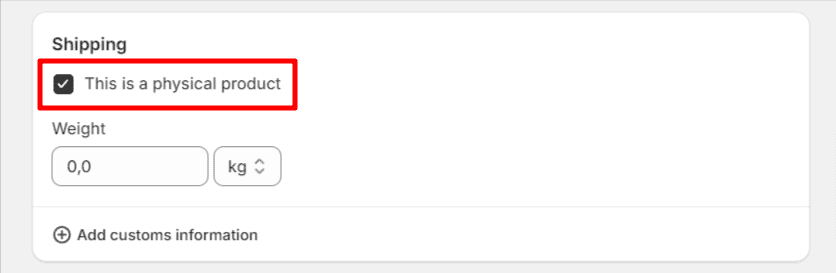
Step 8: Configure the shipping settings
In the "Shipping" section, you'll enter information that affects shipping rates and delivery.
Ensure the box labeled "This is a physical product" is checked. If you're selling a digital product or a service, you should uncheck this box (we'll cover digital products later).
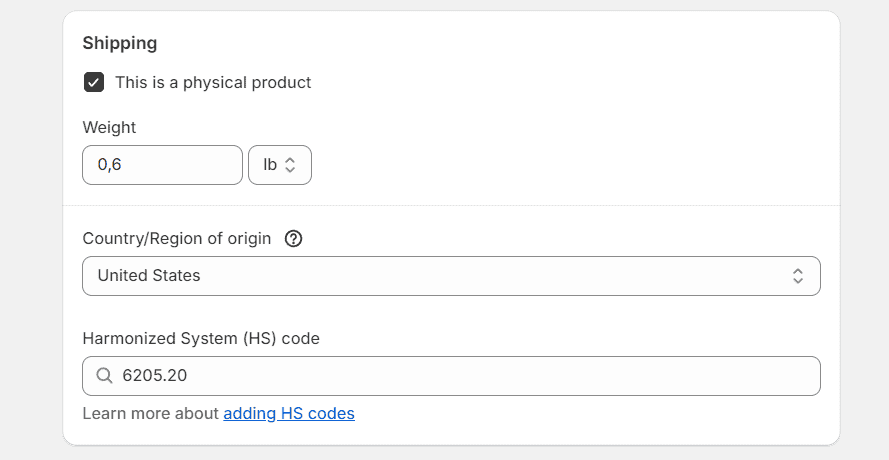
In the "Weight" field, enter the product's weight. Entering the correct weight will result in accurate shipping costs for your customers.
If you plan to ship internationally, providing customs information is also important.
In this case, add the country where the product was manufactured and enter the HS code.
You can type a keyword relevant to your product and Shopify will automatically show relevant HS codes.
Note: The shipping rates are configured in Shopify's shipping settings, not directly on the product page. You can access these settings by clicking on "Settings" at the bottom left and selecting "Shipping and delivery."
Step 9: Add product variants (optional)
Sometimes, your products might come in different versions - like various sizes, colors, or materials.
Instead of creating separate listings for each version, Shopify lets you add variants to a single product.
This makes it easier for customers to see all the options and choose the one they want.
To add variants, scroll down to "Variants" and click "Add options like size or color."
Shopify will automatically show a list of options based on the product category you've selected earlier, but you can also 'create a custom option':
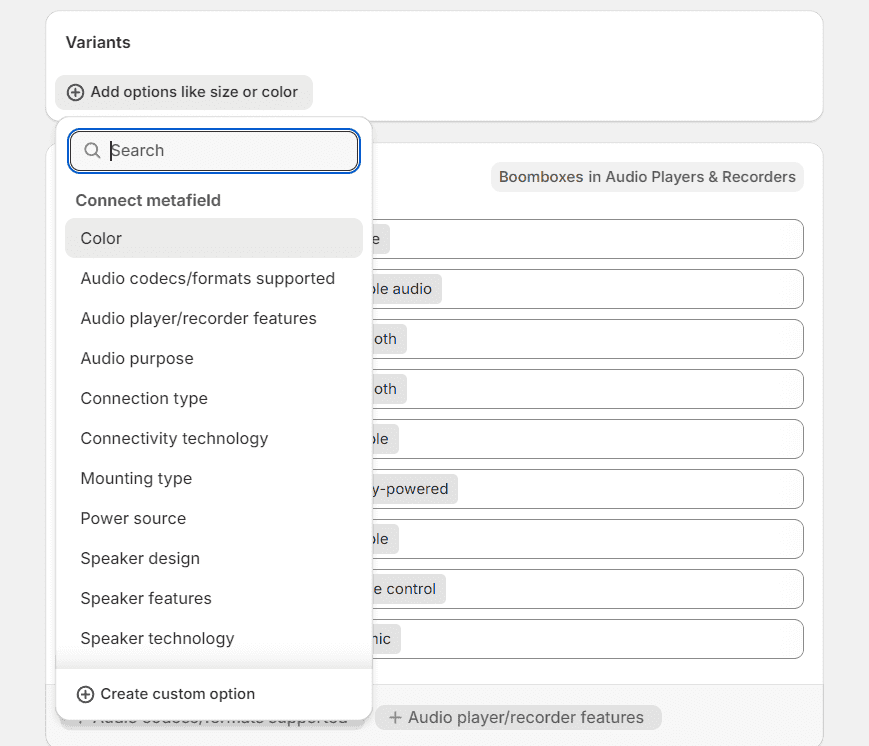
After entering your options (you can add up to three options per product), Shopify will automatically create all possible combinations of variants:
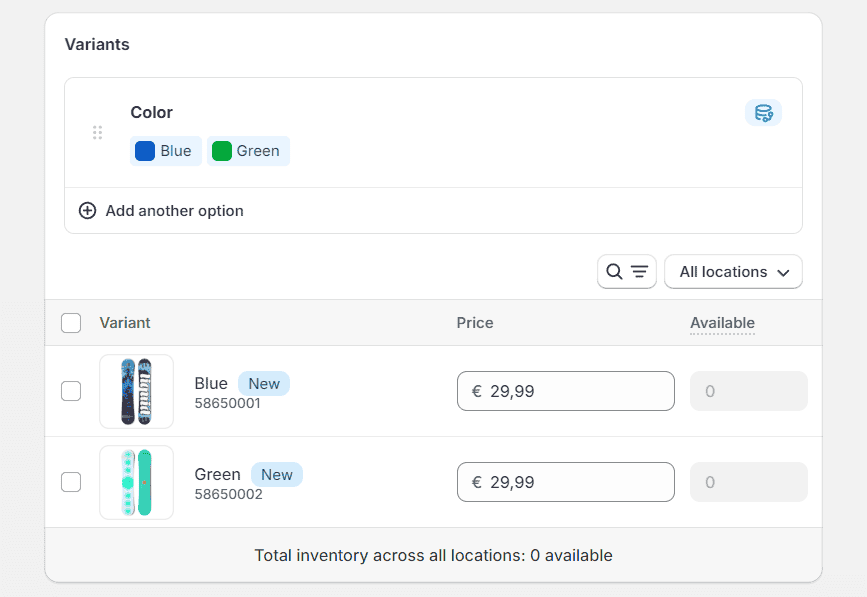
For each variant, you can set a specific price, SKU, barcode, and inventory quantity.
You should also upload or select images that correspond to each variant. This way, when a customer selects a color or size, the image updates accordingly.
Step 10: Add metafields (optional)
Metafields allow you to store additional information about your products that isn't included in Shopify's standard fields.
This could be anything from detailed specifications to special care instructions.
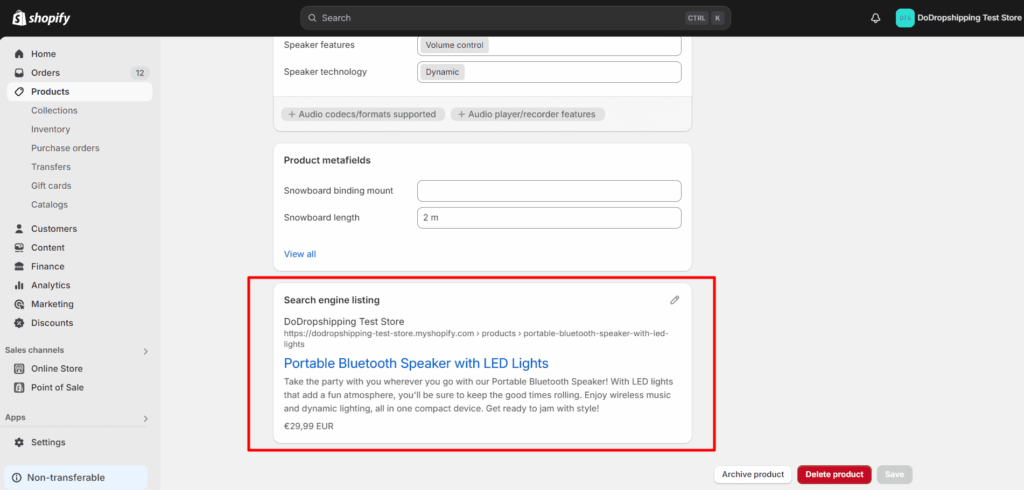
To add metafields, scroll to the bottom of the product page to find the "Metafields" area:

You'll see "Category metafields" (these are for your product variants) and "Product metafields" (these are specific to the product you're currently adding).
You can fill out whichever metafields are relevant to your product or even add new, custom ones.
To display the metafields on your Shopify store, you need to go to "Online Store" > "Themes," then click "Customize."
Then, go to the product page template and add a text block section with a "Dynamic source" where you want the information to appear:

Metafields are a bit more advanced, but they're a great way to dynamically add extra information about your products.
For example, if you're selling clothing, you might have a "Fabric Composition" metafield. And for each product, you can fill out the fabric composition, like "80% Cotton, 20% Polyester."
Step 11: Optimize the SEO settings
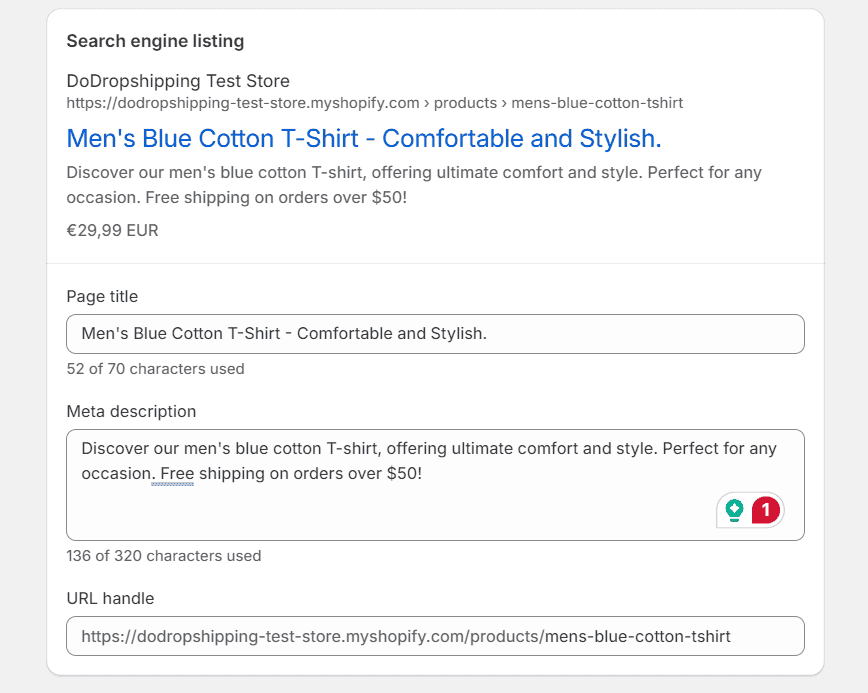
At the very bottom of the product page, you'll find the SEO settings:
By optimizing your product's SEO settings, you help search engines like Google understand your product and, therefore, improve your ranking in search results.
Here are the three fields to fill in and some tips for them:
- Page title. This is the headline that appears in search results. Aim for 50-60 characters to ensure the full title is displayed in search results. Include the product name and key features. You can also add keywords that customers might use when searching.
- Example: Instead of "Awesome T-Shirt," use "Men's Blue Cotton T-Shirt - Comfortable and Stylish."
- Meta description. This is a summary that appears below the title in search results. Here, write a description of your product and keep it between 120-160 characters to prevent it from getting cut off.
- Example: "Discover our men's blue cotton T-shirt, offering ultimate comfort and style. Perfect for any occasion. Free shipping on orders over $50!"
- URL handle. This is the web address of your product page. Shopify automatically generates this based on your product title, but you can simplify it. Keep it short and readable, and use hyphens to separate words.
- Example: "mens-blue-cotton-tshirt"
Step 12: Set the product availability
You're almost there!
At the top right corner of the product page, you'll see the "Product status" section.
Here, you can set up where and when your product will be available for purchase:
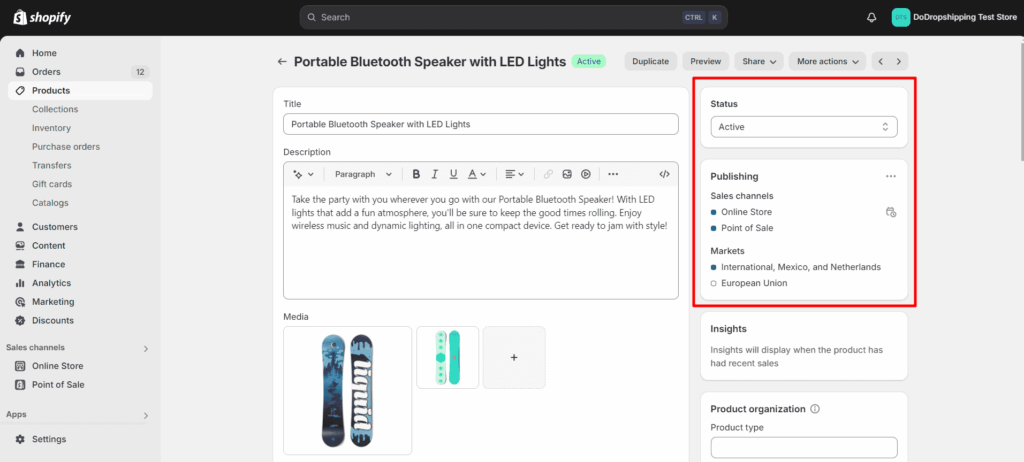
Under "Status," select "Active" if the product is available for customers to purchase. If you're still working on the details, select "Draft."
Below "Publishing," you can select sales channels and markets.
Sales channels are platforms where you sell your products, such as your online store, Facebook Shop, Instagram, or other marketplaces.
Meanwhile, Markets are specific versions of your store that will be shown to visitors from specific countries.
Step 13: Set the product organization
Under "Product organization," you can add even more details to your product:
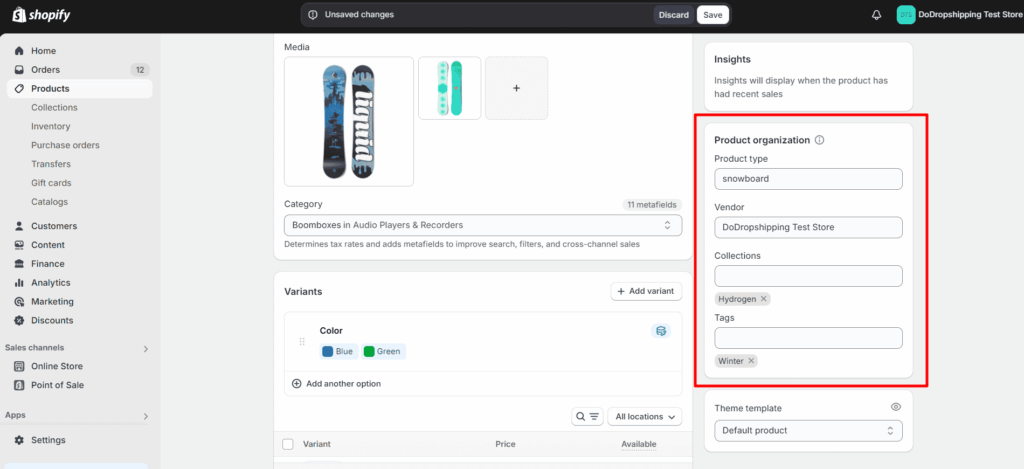
Product organization mainly helps your store easier to navigate.
These settings mostly speak for themselves.
What you should know is that "Collections" are groups of products that you organize together, such as "Summer Sale," "Men's Clothing," or "Best Sellers."
Meanwhile, "Tags" are keywords that help categorize products and make them easier to find through search and filters.
For example, for an eco-friendly water bottle, you might use this product organization:
- Product type. "Water Bottle"
- Vendor. "EcoSip"
- Collections. "Sustainable Products," "Outdoor Gear," "Under $30"
- Tags. "eco-friendly," "reusable," "BPA-free," "hiking," "camping"
Step 14: Choose a theme template (optional)
You've almost completed setting up your product!
The last optional step is to choose a theme template for your product page.
This allows you to customize the look of your product page.
By default, your product will use the "Default product" template provided by your Shopify theme:
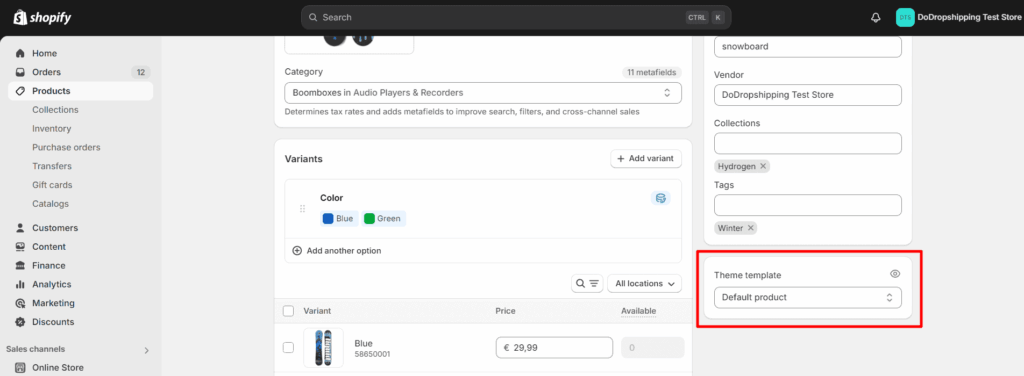
However, some themes offer different templates like "Featured Product," "Pre-Order Product," or "Limited Edition."
Also, if you're using a Shopify page builder, you'll be able to select your custom product page template here.
Note: Once you're done adding your product to Shopify, don't forget to click the 'Save' button at the top!
How to add products to Shopify in bulk
Adding products one by one can be a real hassle if you have a large inventory.
The good news is that Shopify lets you add multiple products at once using a CSV (Comma-Separated Values) file.
We won't go into too much detail about this method in this article, but we will provide the basic steps:
- Download Shopify's CSV Template. Click on "Products" in the left-hand menu. In the top-right corner, click on "Import." In the import window, click "Download sample CSV."
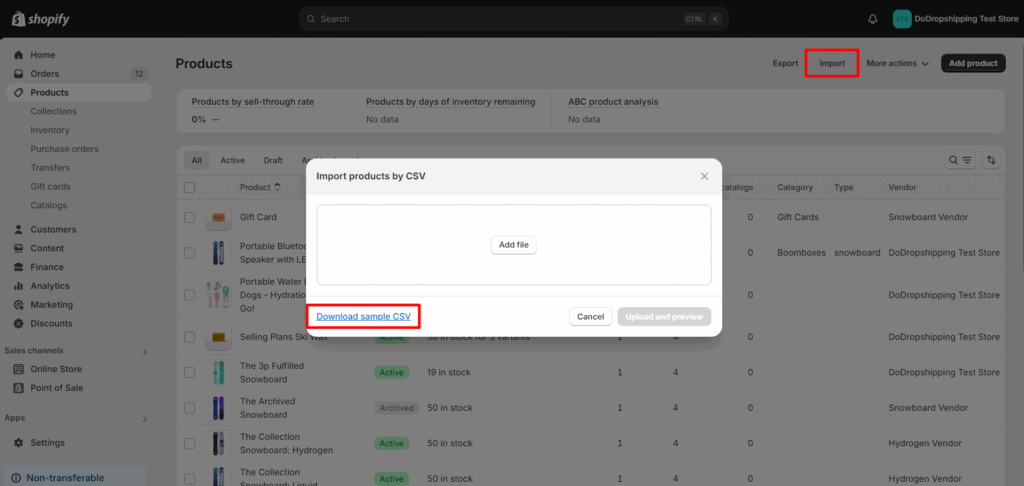
- Open the CSV template. Use a spreadsheet program like Microsoft Excel, Google Sheets, or Apple Numbers and fill out the fields.
- Upload your images. Your product images need to be accessible online so Shopify can import them. So, you can host your images online or add them after importing.
- Import the CSV file into Shopify. After adding the CSV file, Shopify will show a preview of your products. If everything looks good, click "Upload and continue."
Tip: Want to expand your product catalog? Shopify Collective lets you add products from other Shopify stores to your own with no upfront costs and no complicated logistics. Click here to learn more!
Importing products to Shopify from other marketplaces
If you're importing products from popular marketplaces or suppliers like AliExpress, Alibaba, and Printify, there are often easier ways to add these products to your Shopify store.
We'll go over the most searched-for platforms below (AliExpress, Alibaba, and Printify):
AliExpress
To import products from AliExpress to Shopify, you'll need to install a dropshipping app.
We recommend DSers, which you can find on the Shopify App Store:
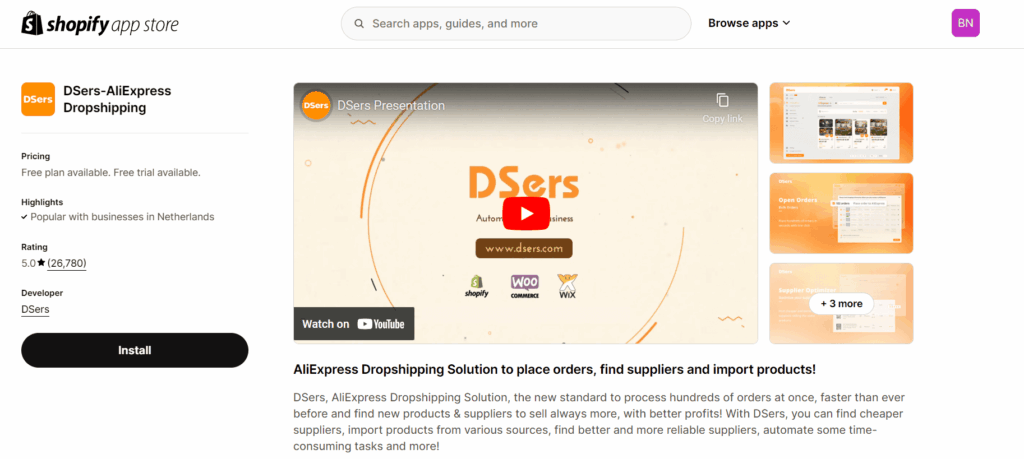
Full review: DSers Review 2026: Pricing, Features & AliExpress Verdict
By installing and setting up DSers, you'll see an "Add To DSers" button when browsing AliExpress:
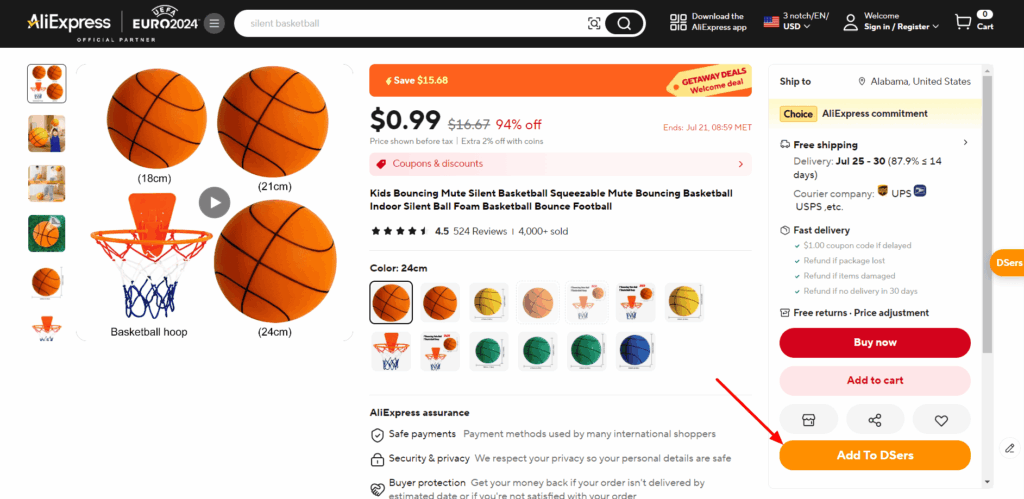
This allows you to easily push products to your Shopify store.
And, when customers place orders on your Shopify store, DSers automatically orders the same products from the AliExpress supplier with your customer's address! (This is called AliExpress dropshipping.)
You can find our complete guide on importing from AliExpress to Shopify here.
Alibaba
If you want to add Alibaba products to Shopify, you can use an Alibaba connection app.
A good example is Importify:
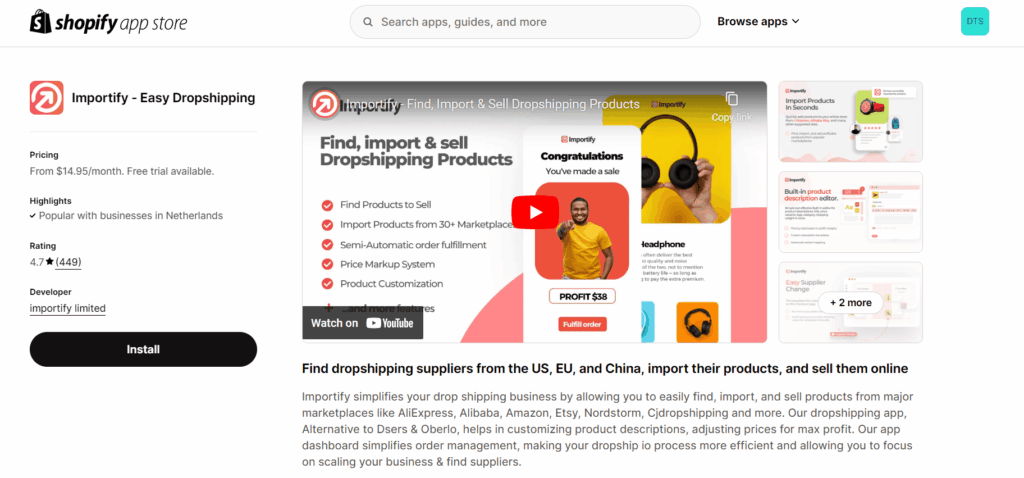
We've written an entire article about importing products from Alibaba to Shopify here.
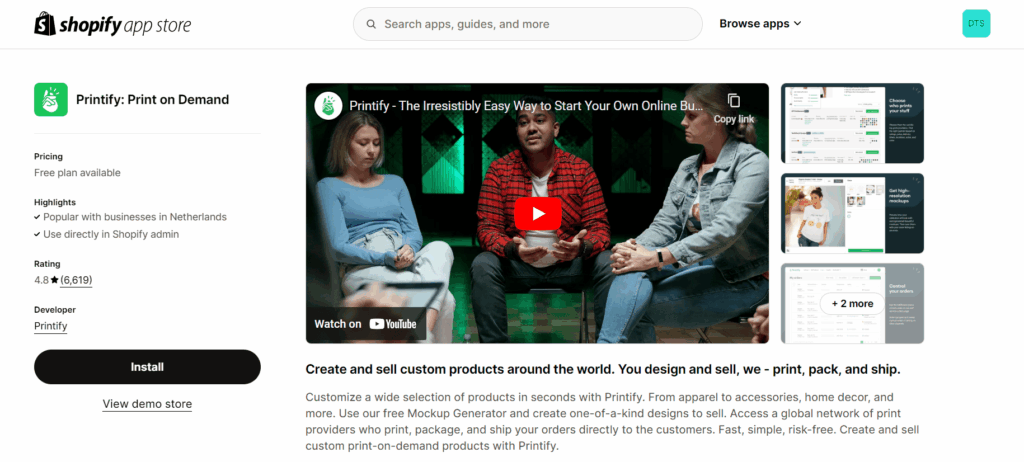
Printify
To add products from Printify to Shopify, you can use Printify's app on the Shopify App store:
What about adding digital products to Shopify?
Adding digital products is similar to adding physical ones, with a few key differences:
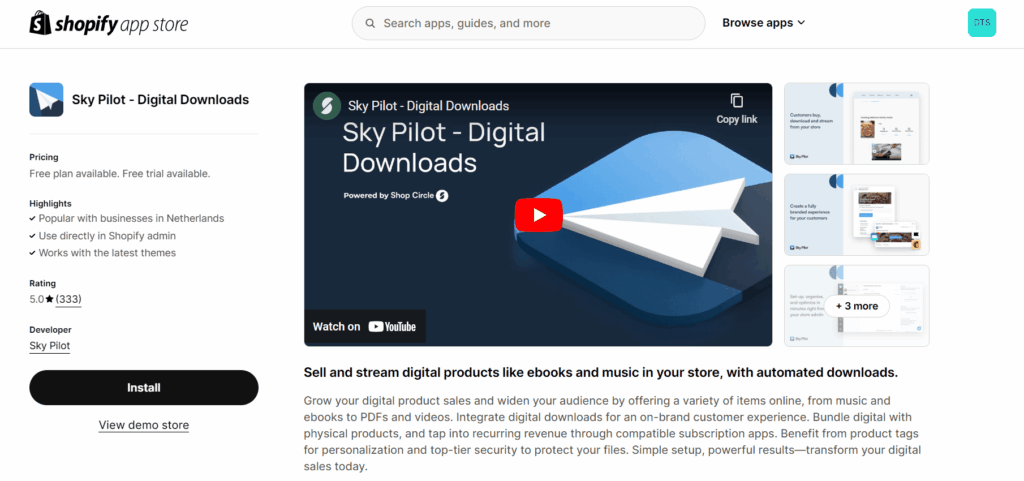
- Install a digital downloads app. Shopify doesn't have built-in support for digital file delivery, so you'll need to use an app to handle this. You can use Shopify's official app or a third-party app like Sky Pilot:
- Disable shipping requirements. Since digital products don't require shipping, you'll need to adjust the shipping settings. To do this, uncheck the box labeled "This is a physical product." This removes shipping options at checkout.
- Configure the fulfillment. To ensure customers receive their digital products immediately, go to "Settings" -> "Checkout." -> "Order processing," and select "Automatically fulfill the order's line items."
Action plan helper
Turn this guide into a simple checklist
Open this article in ChatGPT and get the next steps for your dropshipping store.
Prefer another tool?
Summary
Before we go, we've created a quick summary of this article for you so you can easily remember it:
- You can add products to Shopify by entering product details, adding images, setting pricing, and configuring shipping options.
- You can save time by adding multiple products in bulk using a CSV file.
- You can also import products from marketplaces like AliExpress, Alibaba, DSers, and Printify using connection apps.
Tip: Starting your store from scratch? Storebuild.ai is a free tool by Zendrop that builds a Shopify store with AI and adds ten Zendrop products for you right away. Check it out here.
Conclusion
Great job!
By now, you should know everything you need to know about adding products to your Shopify store.
If you have any questions, let us know in the comments below. And if not, have a great rest of your day!
Want to learn more about Shopify?
Ready to move your Shopify store to the next level? Check out the articles below:
- How to Connect a Dropshipping Supplier to Your Store (2026)
- How Does Shopify Work? Is It Good for Beginners in 2026?
- 28 Shopify Tips to Build a Better Store in 2026 (Guide)
Plus, don't forget to check out our in-depth how to start a Shopify store guide here.